
Before setting up your Kelkoo Sales Tracking Tag
Get your merchantId
See How To get your merchantId
Remove Previous Installations
If your website already includes an older version of Kelkoo Sales Tracking, remove it before installing the tags below. See Remove Previous Installations of Kelkoo Sales Tracking for what to look for and why this matters. Before making any changes, we also recommend backing up any files you're going to modify.
Video Tutorial
The merchant can follow our Video Tutorial to install Kelkoo sales tracking for Shopify. Please refer to the link : Video is available here
Install Kelkoo Sales Tracking module
Implement lead tag
-
Log in to your Shopify account.
-
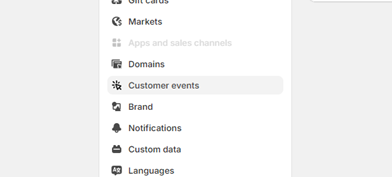
Navigate to and click on Settings.
-
Select Customer Events from the sub-menu.
-
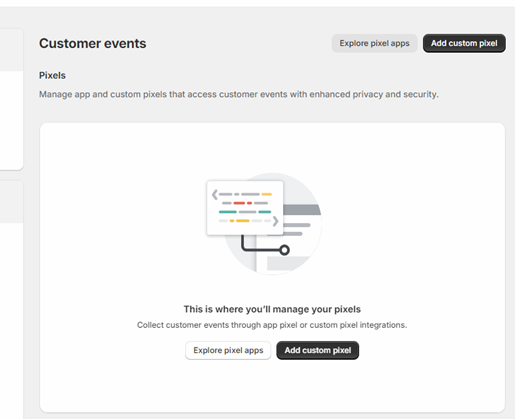
Click on Add Custom Pixel.
-
Set the name of Pixel as Kelkoo Leadtag.
-
Edit the following lines of code:
Leadtag Script
(function() {
    var leadTag = document.createElement('script');
    leadTag.src = 'https://s.kk-resources.com/leadtag.js';
    leadTag.async = true;
    document.head.appendChild(leadTag);
})();
-
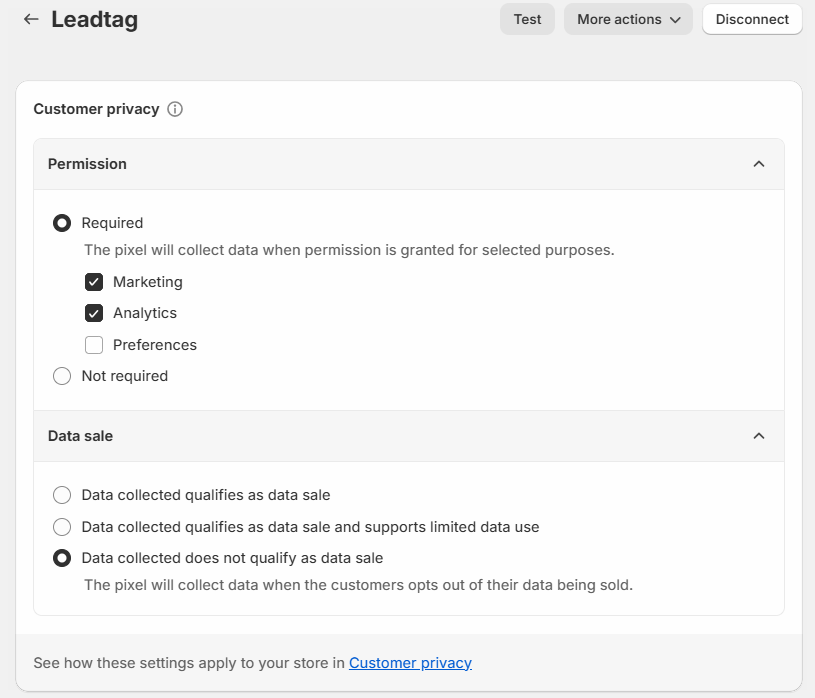
Click on Customer Privacy:
-
Set Permission to Required Marketing / Analytics
-
Set Data Sale to Data Collected does not qualify as data sale
-
-
Scroll to the bottom of the page and select Connect.
The Lead Tag must be gated behind consent while the Conversion Tag should not — see Configuring Consent Management (CMP) for why, and GDPR Notice for Kelkoo Sales Tracking for full details. The "Required Marketing / Analytics" permission set above for this Pixel reflects that requirement.
Implement conversion tag
Follow similar steps to create Pixel
-
Set the name of Pixel as Kelkoo Conversion.
-
Edit the following lines of code:
analytics.subscribe("checkout_completed", event => {
  console.log(event.data.checkout);
  var basketFull = [] ;
  var basketContent ;
  for(i = 0 ; i < event.data.checkout.lineItems.length ; i++) {
    basketContent = {} ;
    basketContent.productname = event.data.checkout.lineItems[i].title ;
    basketContent.productid = event.data.checkout.lineItems[i].id ;
    basketContent.quantity = event.data.checkout.lineItems[i].quantity ;
    basketContent.price = event.data.checkout.lineItems[i].variant.price ;
    basketFull.push(basketContent) ;
  }
  window._kkstrack = {
    merchantInfo : [
          {
              country:'ADD YOUR COUNTRY CODE HERE',
              merchantId:'ADD YOUR MERCHANT ID HERE'
          }
      ],
    orderValue: event.data.checkout.totalPrice.amount,
    orderId: event.data.checkout.order.id,
    basket: basketFull,

    // All the fields below are OPTIONAL. We strongly recommend filling in as many as
    // you can (see "Optional fields" below) — simply remove any line you cannot fill.
    // The exact event.data.checkout property to use for each one is NOT confirmed for
    // Shopify's checkout_completed payload — verify against your own event.data.checkout
    // object (console.log it, as the first line of this function already does) before
    // relying on any of these.
    // coupon: 'COUPON_CODE',
    // returningUser: 'RETURNING_USER',
    // currency: 'CURRENCY',
    // vatAmount: 'VAT_AMOUNT',
    // shippingCost: 'SHIPPING_COST',
    // affiliation: 'AFFILIATION',
    // discountAmount: 'DISCOUNT_AMOUNT',
    // paymentStatus: 'PAYMENT_STATUS',
    // customerLifetimeValue: 'CUSTOMER_LIFETIME_VALUE'
  };
  (function() {
    var s = document.createElement('script');
    s.type = 'text/javascript';
    s.async = true;
    s.src = 'https://s.kk-resources.com/ks.js';
    var x = document.getElementsByTagName('script')[0];
    x.parentNode.insertBefore(s, x);
  })();
});
The basket fields above (productname, productid, quantity, price) already use the canonical field names — see Add Basket Information to Kelkoo Sales Tracking for the full format and why these specific names matter for multi-item baskets.
Optional fields
None of the fields commented out in the code sample above are required for Kelkoo Sales Tracking to work — a sale will still be tracked without them. We strongly encourage you to populate as many as you can, since they directly improve how we optimise your campaigns. For why each field matters, see Why these optional fields matter.
-
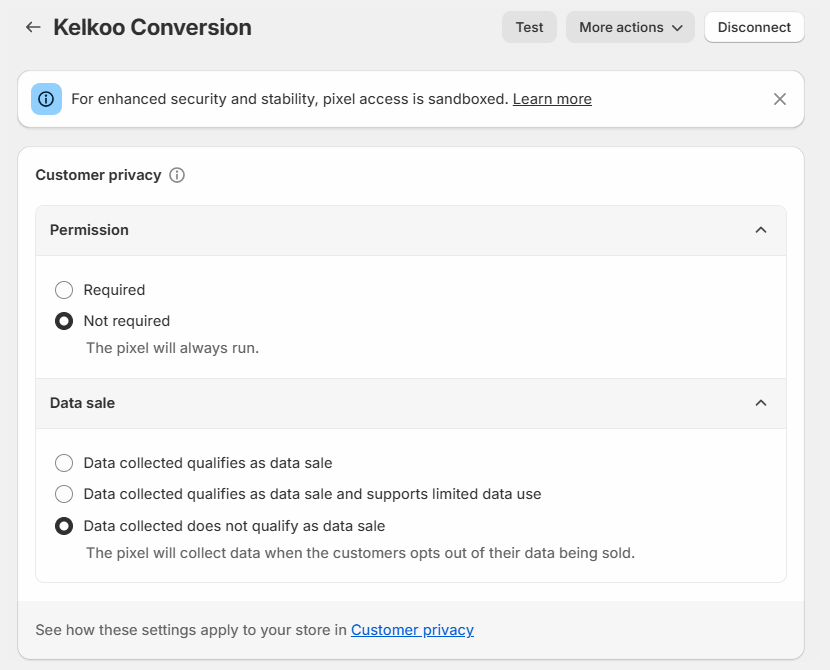
Click on Customer Privacy:
-
Set Permission to Not Required
-
Set Data Sale to Data Collected does not qualify as data sale
-
-
Scroll to the bottom of the page and select Connect.
The Conversion Tag doesn't need to be gated behind consent the way the Lead Tag does — see Configuring Consent Management (CMP) for why. The "Not Required" permission set above for this Pixel reflects that.
Running several campaigns, in several countries, or on several websites?
If you run several campaigns with Kelkoo, you only need to install once, using any of the Merchant IDs available in the merchantInfo array above. Kelkoo matches each sale to the right campaign regardless of which Merchant ID you send, so nothing is missed by using just one.
If you operate more than one website, install a separate Pixel per website, using a Merchant ID that belongs to that website. acme.com and acme.fr are the same website for Kelkoo; acme.com and safe.com are two different websites.
Test your integration
Please check Test your Kelkoo Sales Tracking setup
Troubleshooting
If your installation isn't working correctly, check Troubleshooting Shopify integration